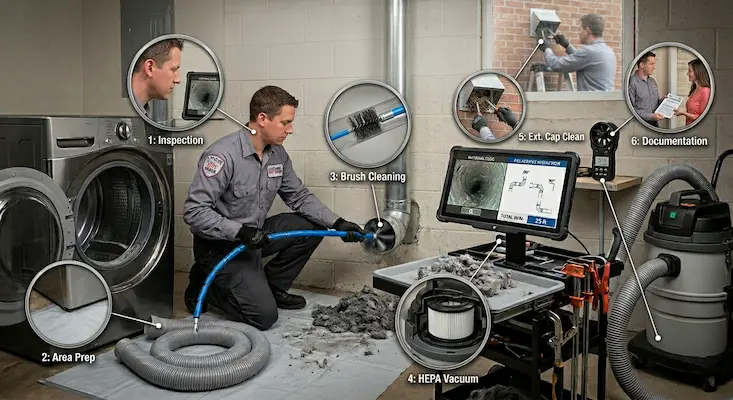
A professional dryer vent cleaning includes a pre service inspection of the full duct system, disconnection of the transition hose, rotary brush cleaning through the entire vent line, high powered vacuum extraction of all loosened debris, exterior vent cap inspection and cleaning, reconnection of the dryer, and a final airflow velocity test to confirm the system is venting at a safe and efficient rate. That is the complete scope. Every one of those steps matters, and skipping even one of them is the difference between a proper service and a surface level clean that leaves your home at risk.
If you have ever booked a dryer vent cleaning and wondered what the technician was actually doing for that hour, or if you are trying to figure out what a legitimate service should include before you hire someone, this guide is going to walk you through every stage in plain language.
Why Understanding the Process Matters Before You Book
Most homeowners think dryer vent cleaning means someone runs a brush through the duct and calls it done. That assumption is exactly what lets low quality operators charge for incomplete work. The U.S. Fire Administration reports approximately 2,900 residential dryer fires per year in the United States, and the National Fire Protection Association confirms that failure to clean is the single leading cause. A job that only clears the first few feet of ductwork does almost nothing to address the lint accumulation sitting 15 or 25 feet deeper in the system.
Knowing what a thorough cleaning actually involves helps you ask the right questions, spot red flags, and make sure the service you are paying for is one that genuinely protects your home.
Step 1: Pre Service System Inspection
Every professional dryer vent cleaning should begin with a full inspection before any equipment touches your ductwork. This is not a formality. It is the diagnostic step that determines what tools will be needed, what conditions exist inside the vent, and whether any issues beyond cleaning require attention.
A proper inspection covers several specific areas.
The technician starts at the dryer connection point and traces the entire duct run mentally and physically, looking for the length of the system, the number of directional changes or elbows, and how the vent exits the building. A longer run with multiple bends accumulates lint faster and requires more aggressive cleaning equipment than a short, straight run to an exterior wall.
The transition hose, which is the flexible section connecting the back of the dryer to the fixed ductwork in the wall, gets evaluated for material compliance. Flexible foil or plastic accordion hoses are no longer code compliant under NFPA 211 standards and are flagged immediately. These ribbed materials trap lint at every ridge along their interior surface and present a significantly higher fire risk than rigid or semi rigid metal duct. If your home still has this type of hose, a reputable technician will note it and discuss replacement as part of the service.
The inspection also includes a check of the ductwork visible behind the dryer for signs of crushing, kinking, or disconnection. A duct that has pulled apart inside a wall vents hot, lint laden air directly into your wall cavity rather than outside, creating both a fire and moisture risk that cleaning alone will not solve.
Finally, the exterior vent termination point is evaluated. The vent cap should be free of obstruction, the flap mechanism should move freely, and there should be no evidence of bird nests, insect buildup, or physical damage to the housing. In the Littleton area, exterior vent caps regularly sustain damage from Colorado hailstorms and can develop gaps that allow pest entry.
Some technicians take a baseline airflow reading at this stage using an anemometer, which measures air velocity at the exterior exit point. This gives a documented before measurement that the post cleaning test result can be compared against. If your technician skips the baseline reading, ask for it.
Our Comprehensive Safety Inspection and Diagnostics service covers every one of these assessment points in detail before a single cleaning tool enters your duct system.
Step 2: Area Preparation and Dryer Disconnection
Once the inspection is complete, the technician prepares the work area. This means pulling the dryer carefully away from the wall to create working space, laying down protective floor covering if needed, and ensuring the appliance is fully powered off and unplugged before disconnection begins.
The transition hose is then disconnected from both the dryer outlet and the wall duct entry point. This step is essential because cleaning from one end of the duct only, without full access at both termination points, produces incomplete results. Lint that gets disturbed but not fully extracted simply relocates to a different section of the duct rather than leaving the system.
During disconnection, the technician inspects the transition hose itself. If it shows significant lint buildup on its interior walls, signs of heat damage, or is constructed of an improper material, the recommendation for replacement comes at this stage. The dryer outlet collar on the back of the appliance is also inspected and cleaned of any accumulated debris.
For homeowners in Highlands Ranch, Sterling Ranch, or Heritage Village whose dryers may be located on upper floors or in interior laundry closets, the ductwork often runs further and through more complex paths before reaching the exterior. Our Residential Dryer Vent Cleaning service accounts for these layout variations with equipment matched to the specific run length and configuration of your home.
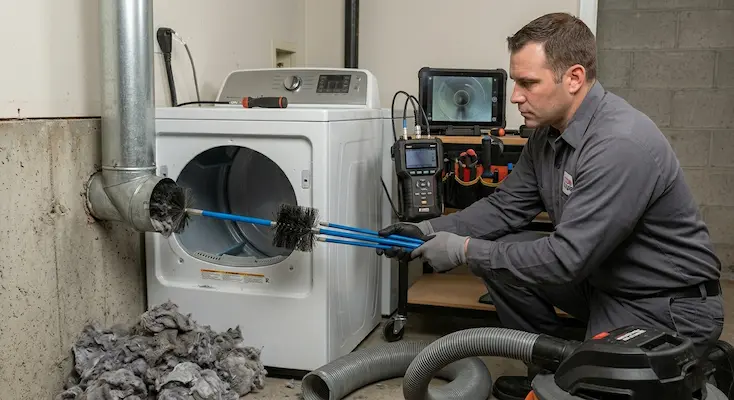
Step 3: Full Length Rotary Brush Cleaning
This is the core of the service and the step that most clearly separates a professional cleaning from a DIY attempt. Rotary brush systems consist of flexible rod sections that connect together and extend through the full length of the duct, fitted with a brush head sized to the interior diameter of the duct. The rod is driven by a rotary power tool that spins the brush at controlled speed as it moves through the duct from one end toward the other.
The spinning action of the brush head dislodges compacted lint from every surface of the duct interior, including the sides, top, and bottom. This is fundamentally different from pushing a static brush through the duct, which only clears the center channel and leaves a ring of buildup packed against the walls.
Professional grade rotary brush systems are designed to navigate elbows and directional changes without losing contact with the duct walls, so even a duct with several 90 degree turns receives thorough coverage throughout its full length. The brush is worked from both the dryer end and the exterior end where possible to ensure complete coverage across the entire system.
The cleaning effort is paired simultaneously with high powered vacuum extraction. As the rotary brush loosens lint from the duct walls, a HEPA rated vacuum draws it outward rather than allowing it to fall further into the system or be pushed back toward the dryer. HEPA filtration in the extraction equipment matters because fine lint particles are small enough to become airborne during cleaning, and a vacuum without adequate filtration simply releases them into your laundry room air. Quality technicians use vacuum equipment rated for fine particulate capture so your indoor air quality is not compromised during the service.
For properties with extended duct runs or complex routing, such as the multi story homes common in Ken Caryl or Columbine Valley, the rod system is extended in sections until the full duct length is covered. No section of the duct should be left uncleaned because a partial clean is a partial risk reduction, not a complete one. Our Dryer Vent Cleaning Columbine Valley and Dryer Vent Cleaning Ken Caryl services are specifically equipped for these extended run configurations.
Step 4: Exterior Vent Cap Cleaning and Inspection
While one technician works the interior of the duct, or after the interior cleaning is complete, the exterior termination point receives dedicated attention. This is an area that many budget operators skip entirely, yet it is one of the most common locations for serious blockages.
The exterior vent cap or vent hood is removed or opened fully, and the interior of the cap housing is cleared of any accumulated lint, debris, spider webs, or nesting material. In Colorado, the spring and summer months bring active nesting activity from house sparrows, starlings, and other cavity nesting birds that find exterior vent openings highly attractive as nesting sites. A vent cap full of nesting material can block airflow almost entirely even after the interior duct has been thoroughly cleaned. Our Bird Nest Removal and Guard Installation service handles situations where active nests require safe removal before vent cleaning can proceed.
The vent cap flap mechanism is tested for free movement. This flap should open fully when air pushes through from the running dryer and close completely when the dryer is off. A flap that sticks open allows cold outside air and pests to enter the duct. A flap that sticks closed creates back pressure that forces heat into the duct system rather than letting it escape.
If the vent cap housing shows physical damage, corrosion, or pest entry gaps, the technician documents this and discusses replacement. In the Littleton area, vent caps on south facing exterior walls often show accelerated weathering from sun exposure, and those on north facing walls can develop rust from Colorado winter moisture. A damaged cap that is otherwise ignored after cleaning simply creates a new blockage or pest entry point within months.
Step 5: Transition Hose Reinstallation and Dryer Reconnection
With the duct interior clean and the exterior cap addressed, the transition hose is reinstalled and the dryer is reconnected. This is not simply reversing the disconnection process. A professional technician checks the transition hose connection at both ends for a secure, airtight fit and verifies that no gaps exist at the dryer collar or the wall duct entry.
If the transition hose was flagged during the inspection as non compliant or damaged, replacement happens at this stage. A proper transition hose for a residential dryer should be rigid metal or semi rigid aluminum duct, with smooth interior walls that do not trap lint. The connection at both ends should be secured with approved metal clamps rather than tape or friction fit alone. Sheet metal screws are not recommended inside dryer transition hoses because the exposed screw tips inside the duct snag lint and create accumulation points.
The technician also verifies that the transition hose is not crushed or kinked behind the dryer before the appliance is pushed back into its installation position. A hose that looks fine when the dryer is pulled out can become severely restricted when the appliance is pushed back against the wall if there is insufficient clearance. This is one of the most common installation problems our team finds, particularly in older Littleton homes where laundry rooms were not designed with adequate depth for modern appliances.
Homeowners in Southglenn or Heritage Village who have experienced longer drying times without any other obvious cause frequently discover that the transition hose behind their dryer is the primary culprit, either because it has been crushed over time or because it is still the original flexible foil hose from when the home was built. For these situations, our Professional Vent Repair and Rerouting service handles both the cleaning and the hose upgrade in a single visit.
Step 6: Post Cleaning Airflow Verification Test
This step is what separates a genuinely complete professional service from a job that simply goes through the motions. After everything is cleaned, reconnected, and the dryer is powered back on, the technician runs the appliance and measures airflow at the exterior vent cap.
The measurement is taken with an anemometer, which reads the velocity of air exiting the system in feet per minute or CFM (cubic feet per minute). A properly functioning residential dryer vent system should produce airflow at the exterior exit point that is strong enough to hold the vent flap fully open and measurable against a published performance baseline for that duct length and configuration.
If the post cleaning airflow reading does not show a meaningful improvement over the baseline taken before cleaning, or if it falls below acceptable parameters for the system design, the technician investigates further. There may be a disconnected section further in the duct that cleaning cleared lint from but did not seal, a secondary blockage at an elbow that the brush did not fully address, or a crushed section of rigid duct inside the wall that is restricting flow regardless of how clean the interior surfaces are.
This verification step is the documented proof that the cleaning worked. Without it, neither the technician nor the homeowner has objective confirmation that the system is actually performing safely. A legitimate service provider does not skip the airflow test because the test is what makes the service accountable.
We provide before and after airflow documentation for every cleaning we complete, giving you a clear record of the system condition both before and after service. This documentation is also useful for homeowners in the Sterling Ranch or Southglenn communities who want records for home insurance purposes or who are planning to sell their property. Our Dryer Vent Cleaning Sterling Ranch and Dryer Vent Cleaning Southglenn services both include full airflow documentation as standard.
What a Complete Professional Service Should Also Flag
Beyond the core cleaning steps, a thorough professional visit should produce a written or verbal summary of anything the technician observed that falls outside normal parameters. This includes:
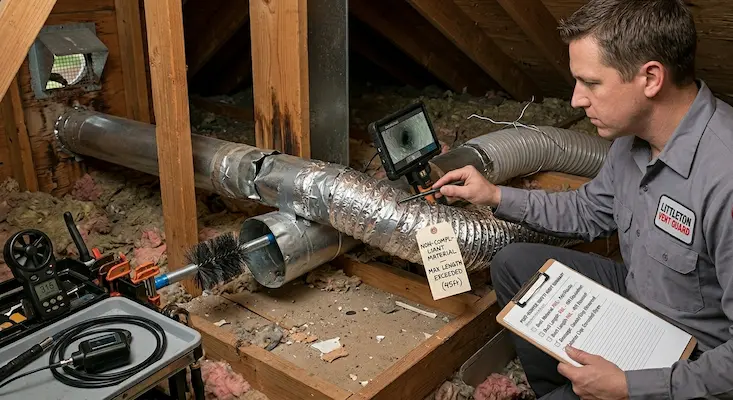
Duct material issues. If any section of your duct uses flexible foil, plastic accordion hose, or any material not approved under NFPA 211, this should be flagged with a recommendation and a cost estimate for upgrade.
Duct length compliance. Under NFPA 211 and most local building codes, a residential dryer vent cannot exceed a maximum equivalent length that accounts for both straight runs and the additional resistance created by each elbow. The standard maximum for most configurations is 35 feet of equivalent length, with each 90 degree elbow counting as five feet. A duct that exceeds this limit cannot achieve adequate airflow regardless of how clean it is, and the solution requires rerouting rather than more frequent cleaning.
Disconnected or damaged sections. If any portion of the duct inside the wall is found to be separated or crushed, cleaning alone will not resolve the problem. A duct that vents hot air into a wall cavity is a structural moisture and fire risk that requires repair.
Exterior cap condition. Any damage, corrosion, or pest entry gaps at the vent termination point should be documented with a recommendation for replacement.
Secondary concerns. A good technician will also note anything unusual they observed, such as signs of prior overheating on the duct walls, evidence of repeated moisture saturation, or indications that the dryer itself may have a mechanical issue contributing to the problem.
For commercial properties, apartment complexes, and multi family buildings across Arapahoe County, this documentation component is especially important for liability and compliance purposes. Our Commercial and Multi Family Vent Maintenance service includes detailed written condition reports for every unit serviced.
How Long Does a Professional Dryer Vent Cleaning Take?
For a standard residential dryer vent with a run of under 25 feet and a straightforward exterior termination, a thorough professional cleaning takes between 45 minutes and 90 minutes from arrival to completion. This includes the inspection, preparation, full cleaning, exterior cap service, reconnection, and airflow testing.
Longer runs, roof terminated vents, complex multi floor configurations, or situations where significant debris removal is required can extend the service to two hours or more. If a technician completes a job in under 30 minutes, it is a reasonable question to ask what was actually included in that visit.
What Makes a Professional Cleaning Different From DIY
DIY dryer vent cleaning kits are widely available and can remove surface lint from the first few feet of the transition hose and the dryer outlet. For a homeowner with a very short, straight vent run and consistent annual professional service, a periodic DIY check of the accessible sections is a reasonable supplemental habit.
However, there are several things DIY cleaning cannot replicate. A consumer brush kit on a flexible rod does not have the rotary drive mechanism that keeps the brush in contact with the duct walls through its full rotation. Without that spinning action, the brush only clears the center channel of the duct. Consumer vacuum attachments do not have the airflow power to extract compacted lint from 20 or 30 feet of duct at the suction levels required for thorough removal. And no DIY kit includes the anemometer and CFM measurement capability required to confirm whether the cleaning was actually effective.
The other practical risk of DIY cleaning is that flexible rod systems can break inside the duct if they bind against an elbow, leaving a brush head and broken rod section lodged in the ductwork. Extracting a broken DIY tool from an in wall duct section requires professional equipment and occasionally requires wall access.
For homeowners in Highlands Ranch or throughout Arapahoe County who want a genuine maintenance solution rather than a partial measure, our Dryer Vent Cleaning Highlands Ranch service delivers the complete professional process described in this article.
Frequently Asked Questions
Does professional dryer vent cleaning include the lint trap?
The lint trap or lint screen inside the dryer is typically cleaned as part of the service, and the lint trap housing channel is vacuumed where accessible. However, the lint trap itself is a dryer component rather than a vent component and is something homeowners should be clearing before or after every load regardless of professional service intervals.
Will the technician make a mess in my laundry room?
A properly equipped professional cleaning should produce minimal mess. The HEPA vacuum extraction system captures loosened lint as it is dislodged rather than allowing it to become airborne in your laundry room. Protective floor covering is placed before the dryer is moved, and the area is left clean after the service.
Do I need to be home during the cleaning?
Access to the laundry room is required, and ideally homeowner presence is helpful so the technician can walk you through any findings. However, the service can be completed with any authorized adult present at the property.
What if my dryer vent exits through the roof instead of a side wall?
Roof terminated dryer vents are serviceable but require additional equipment and time due to the longer run and the need to access the exterior from the roofline. They also tend to accumulate lint faster due to the vertical run and greater exposure to temperature extremes. If your home in Ken Caryl or Columbine Valley has a roof terminated vent, make sure your service provider has confirmed they have the tools and experience for that configuration before booking.
How do I know if the company I am hiring does a thorough job?
Ask specifically whether the service includes a pre cleaning airflow baseline measurement, whether they use a rotary brush system rather than a static push through brush, whether debris is extracted by vacuum rather than blown out, and whether they perform a post cleaning airflow verification test with documented results. A company that can answer yes to all four of those questions is performing a proper professional service.
Professional dryer vent cleaning is not a commodity. The depth, sequence, and quality of each step in the process directly determine whether your home is meaningfully safer and more efficient after the service or whether you have simply paid for someone to spend an hour in your laundry room without resolving the actual risk.
If your home is in Littleton, Highlands Ranch, Southglenn, Ken Caryl, Sterling Ranch, Heritage Village, or anywhere across Arapahoe County and you want a service that covers every step described in this article, you can contact us here or call us directly to schedule. We do not cut corners on the process because the process is the whole point.